
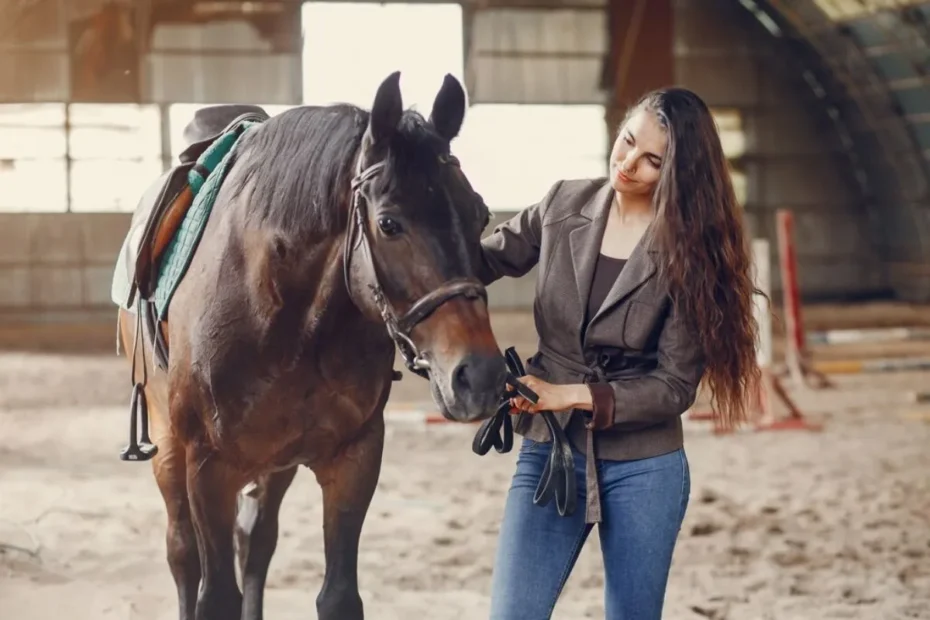
In the captivating world of equestrian photography, the true magic often happens during the post-processing stage. This comprehensive guide will explore expert post-processing techniques to elevate the beauty and intricate details of your equine portraits. From color correction and noise reduction to selective editing and artistic effects, you’ll discover how to transform your horse imagery into stunning, professional-quality masterpieces.
Whether you’re a seasoned equestrian photographer or just starting your journey, mastering these post-processing skills will empower you to create breathtaking, visually compelling photographs that capture the essence and elegance of your equine subjects. Dive in and unlock the full potential of your equestrian photos through the power of digital post-processing.
Key Takeaways
- Explore proven post-processing techniques to enhance the visual appeal of equestrian photos
- Learn how to correct colors, reduce noise, and sharpen details for a professional-grade finish
- Discover selective editing methods to draw attention to your equine subjects
- Unlock the creative potential of your equestrian imagery through artistic effects and presets
- Streamline your post-processing workflow for increased efficiency and productivity
Introduction to Equestrian Photo Editing
As passionate equestrian photographers, we understand the importance of post-processing in capturing the beauty and detail of our equine subjects.
The art of understanding the importance of post-processing for equestrian photos is a crucial step in elevating your images and telling a captivating story.
Understanding the Importance of Post-Processing
Post-processing, or photo editing, allows you to fine-tune your images and bring out the best in your equine subjects. From adjusting colors and enhancing contrast to reducing noise and sharpening details, the right editing techniques can transform a good photo into a stunning masterpiece.
By understanding the importance of post-processing for equestrian photos, you’ll discover how to create visually striking images that captivate your audience.
Essential Tools and Software for Equestrian Photo Editing
To elevate your equestrian photography, it’s essential to have the right essential tools and software for equine photo editing in your arsenal. Some of the most popular and powerful tools include Adobe Photoshop, Lightroom, and Capture One.
These versatile software options offer a wide range of features and capabilities, allowing you to precisely adjust, refine, and enhance your equine portraits.
Whether you’re a beginner or an experienced equestrian photographer, mastering the art of post-processing can unlock new creative possibilities and help you capture the true essence of your equine subjects.
By understanding the importance of post-processing and utilizing the right essential tools and software for equine photo editing, you’ll be well on your way to producing stunning equestrian images that captivate and inspire your audience.
Enhancing Color and Contrast
Capturing the true essence of your equine subjects requires more than just a well-composed shot. Proper color correction is crucial for creating vibrant, life-like equine portraits.
In this section, we’ll explore techniques for adjusting the color, saturation, and contrast of your equestrian photos to make your horse’s coat, eyes, and surroundings truly captivating.
Color Correction for Vibrant Equine Portraits
Whether your horse has a rich chestnut coat or a striking gray mane, ensuring accurate color representation is key to producing stunning color correction for horse pictures. By utilizing advanced editing tools, you can fine-tune the hues and tones, bringing out the natural beauty of your equine subjects.
From adjusting the white balance to selectively enhancing specific color channels, the right color correction techniques can truly make your equestrian photos pop with life.
One of the most important steps in enhancing color and contrast in equestrian photos is to address any color casts or imbalances. Perhaps the lighting conditions during your shoot were less than ideal, resulting in a slightly cool or warm tint to the image.
By carefully calibrating the white balance, you can restore the natural color balance, making your horse’s coat and the surrounding environment appear more true to life.
“The key to creating vibrant equine portraits is to master the art of color correction. With the right techniques, you can truly make your horse’s unique features stand out.”
In addition to white balance adjustments, selective color adjustments can be a powerful tool in your post-processing arsenal. By targeting specific color channels, such as reds, blues, or greens, you can enhance the vibrancy of your horse’s coat, eyes, or the lush greenery in the background.
Experimenting with saturation, hue, and luminance sliders can help you achieve the perfect balance of color correction for horse pictures and create truly captivating equestrian photos.
Noise Reduction Techniques
Capturing captivating equestrian photographs often presents challenges, especially when shooting in low-light conditions or with high ISO settings.
These factors can introduce unwanted graininess, or noise, in your images. However, with the right noise reduction techniques, you can eliminate this undesirable effect and create clean, professional-looking equine imagery.
Embrace Digital Noise Reduction
Many modern digital cameras and photo editing software offer built-in noise reduction capabilities. Utilize these tools to effectively minimize noise in your equestrian photographs. Experiment with the various noise reduction settings to find the perfect balance that preserves detail without over-smoothing your images.
Leverage Third-Party Noise Reduction Software
For more advanced noise reduction, consider investing in specialized third-party software. These powerful tools, such as Topaz DeNoise AI or DxO PhotoLab, employ sophisticated algorithms to intelligently reduce noise while maintaining the sharpness and clarity of your equine subjects.
“The key to successful noise reduction is finding the right balance between eliminating unwanted graininess and preserving the natural texture and detail of your equestrian photographs.”
Mastering Noise Reduction Workflow
- Apply noise reduction as the first step in your post-processing workflow, before making other adjustments.
- Use selective noise reduction techniques to target specific areas of the image, such as the background or the horse’s coat, without over-processing the entire frame.
- Experiment with different noise reduction algorithms and settings to find the optimal solution for your specific images and lighting conditions.
By incorporating these noise reduction techniques into your equestrian photography workflow, you can elevate the quality of your images and showcase the beauty and detail of your equine subjects with stunning clarity.
Sharpening Techniques for Crisp Details
Achieving sharp, detailed images is crucial for captivating equestrian photography. In this section, we’ll explore the art of sharpening techniques that can elevate your equine portraits, ensuring your horse’s features stand out with stunning clarity and precision.
Selective Sharpening for Equine Subjects
Selective sharpening is a powerful tool in the equestrian photographer’s arsenal. By targeting specific areas of your image, you can enhance the definition and clarity of your horse’s mane, eyes, and other key details, without over-sharpening the entire frame. This technique allows you to draw the viewer’s attention to the most important elements of your photograph.
To apply selective sharpening, consider these tips:
- Identify the critical areas of your image that require sharpening, such as the horse’s face, legs, or any areas of specific focus.
- Use masking tools to isolate these regions and apply targeted sharpening, adjusting the intensity to achieve the desired level of detail.
- Experiment with different sharpening methods, including unsharp mask, high-pass filter, and edge sharpening, to find the technique that best suits your image and style.
“Selective sharpening is a game-changer for equestrian photographers. It allows you to refine the most important aspects of your image and create a truly captivating final product.”
By mastering the art of selective sharpening, you’ll be able to elevate your equestrian photographs, drawing the viewer’s eye to the intricate details that make your equine subjects truly shine.
Adjusting Exposure and Highlights
Capturing the perfect equestrian photo often requires navigating challenging lighting conditions. Whether you’re shooting in bright sunlight or deep shadow, mastering the art of adjusting exposure and highlights is crucial for achieving the desired balance and detail in your horse photos.
Balancing Exposure in Challenging Lighting Conditions
Equestrian photography frequently involves dealing with a range of lighting scenarios, from the harsh glare of direct sunlight to the subtle nuances of shadow and dappled light.
To ensure your horse’s features are properly exposed and maintain the right balance throughout your images, consider these techniques:
- Utilize Exposure Bracketing: This technique involves capturing multiple shots at different exposure levels, allowing you to select the best-exposed image or blend them for optimal results.
- Adjust Highlights and Shadows: Carefully manipulate the highlights and shadows in your post-processing software to bring out the details in your horse’s coat and features, balancing exposure in challenging lighting conditions for equestrian photos.
- Leverage Graduated Neutral Density Filters: These specialized filters can help you adjust exposure in horse photos by reducing the brightness of the sky or other overexposed areas, creating a more balanced overall exposure.
“The key to successful equestrian photography is often found in the post-processing stage, where you can fine-tune the exposure and highlights to bring out the best in your subject.”
By mastering these techniques, you’ll be able to capture stunning equestrian images that showcase your horse’s beauty and detail, even in the most challenging lighting conditions.
Post-Processing Techniques for Equestrian Photos
Capturing stunning equestrian photos is just the start of the creative process. To truly elevate your images, mastering post-processing techniques is essential. In this section, we’ll explore a range of powerful tools and methods that can help you enhance the beauty and detail of your equine photography.
One of the foundational post-processing steps is color correction. By fine-tuning the hues and saturation of your images, you can make the colors of your equine subjects and their surroundings pop, creating a more vibrant and captivating visual experience.
Additionally, adjusting the contrast can help to emphasize the horse’s muscular structure, revealing the intricate details that bring your photos to life.
Noise reduction is another crucial technique in the world of equestrian photography. By carefully addressing any unwanted graininess or digital noise in your images, you can achieve a smooth, professional-grade finish, ensuring your viewers are drawn to the subject matter, not distracting visual elements.
- Enhance color and contrast for vibrant equine portraits
- Apply noise reduction techniques for a clean, polished look
- Selectively sharpen key areas to accentuate equine details
- Adjust exposure and highlights to balance challenging lighting
- Utilize masking and layering for targeted editing of your equine subjects
By mastering these post-processing techniques for equestrian photos, you can unlock a new level of creativity and help your equine subjects truly shine.
With a little practice and the right tools, you’ll be able to transform your equestrian photos into works of art that captivate your audience and showcase the beauty of these majestic animals.
Selective Editing for Equine Subjects
When it comes to equestrian photography, selective editing can be a game-changer. By focusing on specific elements within your images, you can enhance the beauty and detail of your horse’s features with precision.
This is where masking and layering techniques come into play, allowing you to refine your equine subjects with unparalleled control.
Masking, the art of isolating specific areas of an image, enables you to make targeted adjustments without affecting the surrounding elements.
This technique is particularly useful when you want to accentuate your horse’s muscular structure, adjust the lighting on its face, or even remove unwanted distractions. By carefully layering different editing steps, you can create a seamless and polished final result.
Masking and Layering Techniques
Masking and layering techniques offer a wealth of possibilities for selective editing of equine subjects. Here are a few key strategies to consider:
- Utilize layer masks to isolate specific areas of your image, such as the horse’s eyes, mane, or hooves, and make precise adjustments without affecting the rest of the photograph.
- Experiment with blending modes and opacity levels to achieve the desired balance between your edited layers and the original image, ensuring a natural and harmonious result.
- Employ smart selection tools to quickly and accurately select the horse’s outline, allowing you to apply edits or effects solely to the equine subject.
- Leverage adjustment layers to make global changes to your image’s color, contrast, or exposure, while maintaining the ability to fine-tune specific areas using layer masks.
By mastering these selective editing techniques for equine subjects, you’ll be able to elevate your equestrian photography to new heights, creating stunning and captivating images that truly showcase the beauty and elegance of your horse.
Retouching and Blemish Removal
In the world of equestrian photography, capturing the beauty and elegance of these majestic animals is paramount.
However, even the most skilled photographers may encounter the occasional blemish or imperfection in their images. Retouching and blemish removal techniques can help transform your equestrian photos, ensuring your horse’s appearance is flawless and captivating.
One of the most common issues in equestrian photos is the presence of small nicks, scuffs, or dirt on the horse’s coat.
Using specialized editing tools, you can seamlessly retouch these areas, blending them with the surrounding fur to create a smooth, unblemished appearance. This attention to detail can elevate your images, making them even more stunning and professional.
Additionally, blemish removal techniques can help address more significant imperfections, such as scars, swollen joints, or other visible markings. By selectively editing these areas, you can ensure your horse’s natural beauty shines through, without any distracting elements.
Remember, the goal of retouching and blemish removal is not to create an unrealistic or artificial look, but rather to enhance the natural beauty of your equestrian subject. With a delicate touch and a keen eye, you can transform your photos, leaving your viewers captivated by the equine elegance on display.
- Identify and assess any blemishes or imperfections in your equestrian photos
- Select the appropriate editing tools and techniques to retouch and remove these elements
- Blend the retouched areas seamlessly with the surrounding fur or skin
- Ensure the final image maintains a natural and authentic appearance
“The true magic of equestrian photography lies in capturing the grace and power of these magnificent creatures. With careful retouching and blemish removal, you can elevate your images to new heights, showcasing the equine subjects in all their glory.”
Adding Artistic Effects and Presets
Elevate your equestrian photos with a touch of artistic flair. Discover how to apply creative filters, overlays, and other editing techniques to transform your images and give them a distinctive, professional-grade look.
Creating Unique Looks with Presets and Filters
Presets and filters are powerful tools in the world of equestrian photography. By experimenting with these features, you can create unique and captivating looks for your horse-related images. Whether you’re aiming for a moody, dramatic effect or a vibrant, vibrant aesthetic, the right preset or filter can make all the difference.
For instance, you might try a vintage-inspired filter to give your photos a timeless, nostalgic feel. Alternatively, a high-contrast preset can add depth and intensity to your equine portraits. The possibilities are endless, and the key is to find the right combination that aligns with your creative vision.
- Experiment with a variety of presets and filters to find your signature style.
- Pay attention to how different effects enhance the colors, textures, and overall mood of your equestrian photos.
- Selectively apply presets and filters to specific areas of your image for a more refined, tailored look.
Remember, the goal is to add artistic effects and presets for equestrian photos and create unique looks with presets and filters for horse photography. With a little creativity and experimentation, you can elevate your equestrian images to new heights.
Batch Processing for Efficiency
In the realm of equestrian photography, where capturing the beauty and grace of our four-legged companions is paramount, the challenge of dealing with a large volume of images can be daunting.
Fortunately, the power of batch processing can revolutionize your workflow, allowing you to streamline your post-processing tasks and enhance your batch processing for efficiency in equestrian photo editing.
One of the key advantages of batch processing is its ability to apply consistent edits and presets across multiple images. This not only saves you time but also ensures a cohesive aesthetic throughout your equestrian portfolio.
By leveraging the power of automation, you can quickly adjust exposure, color, and other settings with a few clicks, freeing up your valuable time to focus on the creative aspects of your work.
- Streamline your workflow with batch processing techniques
- Apply consistent edits and presets across multiple images
- Enhance your batch processing for efficiency in equestrian photo editing
- Save time and maintain a cohesive aesthetic in your portfolio
“Batch processing has been a game-changer in my equestrian photography business. It has allowed me to work more efficiently, without sacrificing the quality of my images.”
But the benefits of batch processing don’t stop there. By automating repetitive tasks, you can also minimize the risk of human error and ensure consistent quality across your entire collection of equestrian photos.
This level of efficiency not only streamlines your workflow but also allows you to focus on the creative aspects of your craft, ultimately elevating the impact of your batch processing for efficiency in equestrian photo editing.
So, whether you’re a seasoned equestrian photographer or just starting out, embracing the power of batch processing can be a transformative step in optimizing your post-processing workflow and delivering exceptional results for your clients and audience.
Best Practices and Workflow Tips
Streamlining Your Equestrian Photo Editing Workflow
To optimize your equestrian photo editing process, it’s essential to establish an efficient and organized workflow. Begin by developing a consistent file management system, ensuring your images are well-organized and easy to access. Implement a standardized naming convention and create a logical folder structure to keep your files in order.
Next, familiarize yourself with your preferred photo editing software’s keyboard shortcuts and tools. Mastering these can significantly boost your productivity and reduce the time spent on repetitive tasks.
Streamline your editing process by creating custom presets, brush settings, and automation scripts tailored to the specific needs of your equine photography projects.
Remember to build in regular breaks and avoid burnout. Editing can be a meticulous and time-consuming process, so be sure to take breaks to stretch, refocus, and maintain your creative energy.
By incorporating these best practices into your equestrian photo editing workflow, you’ll enhance the efficiency and quality of your final images, ultimately delivering stunning results for your clients and elevating your equine photography to new heights.
FAQ
What are the key post-processing techniques for enhancing equestrian photos?
The essential post-processing techniques for equestrian photos include color correction, noise reduction, sharpening, exposure adjustment, selective editing, retouching, and adding artistic effects or presets.
Why is post-processing important for equestrian photography?
Post-processing is crucial for equestrian photography to bring out the best in your equine subjects, correct any technical issues, and create visually stunning, professional-looking images.
What tools and software are recommended for editing equestrian photos?
Popular tools and software for equestrian photo editing include Adobe Photoshop, Adobe Lightroom, Capture One, and specialized plugins or presets designed for enhancing equine imagery.
How do I correct the color and contrast in my equestrian photos?
Techniques for enhancing color and contrast in equestrian photos include adjusting the white balance, saturation, vibrance, and shadows/highlights to make your horse’s coat, eyes, and surroundings pop.
What noise reduction methods are effective for equine photography?
Effective noise reduction techniques for equestrian photos involve using tools like luminance and color noise reduction, as well as applying selective sharpening to maintain detail while reducing unwanted graininess.
How can I sharpen my equestrian photos for crisp, detailed results?
To achieve sharp, detailed equestrian photos, you can use targeted sharpening techniques, such as applying selective sharpening to the horse’s features and using masking to avoid over-sharpening the background.
I’m Fredson Smith, a dedicated researcher at Dincards, passionate about exploring and sharing the diverse world of equines with our readers.